Friday, July 12, 2019

More Sandblasting, Rust-Proofing and Final Cleanup


On the final leg of sandblasting, I removed the torsion bars and spring plates to get a thorough sandblast and rust-proof in-between. In order to do this, I made the pan level, knocked the spring plates out just enough to pop off of their stops and measured the angle with an angle finder so that I could reinstall them correctly. 16 degrees on both sides!


With these removed, I finished sandblasting the pan. I underestimated how much of a hassle sandblasting this pan myself would be. It took me around two months doing it myself in my free time.  If I were to do it again, I would just drop it off somewhere. Anyway, I ended up doing it in sections, making the realization that I couldn't do the whole thing at one time with the small sandblaster that I had. I carefully rust-proofed it as I went with phosphoric acid.

It's finally completed and rust free. there were several areas where some stubborn undercoating had to be removed by hand, but it wasn't too bad.


Final Cleanup Before Paint

Monday, May 6, 2019

Chassis Disassembly, Sandblasting and More Welding


Removed the front end beam and transmission from the rear end so that the pan could be sandblasted. It was pretty simple for the most part. Removing the transmission was the most challenging: disconnecting the emergency brake cables, spring plates and shift rod.


Slid it out and started blasting. 

Worse than expected.


The Undercoating...The sandblaster cannot penetrate the undercoating on the bottom of the pan, so I am worked on removing it with Gunk, various other degreasers and a needle scaler. It came off slowly, taking too much time. Paint stripper worked pretty well, enabling me to sandblast the rest. This process has also revealed some rust holes in the rear drivers side pan. Right now there are only a few small holes and hopefully not many more will show up. I will patched in a new floor section.

I ordered a new floor section for this area from CIP1, stripped the paint and traced out where it would go, cut it and clamped it into place.


Stitch welded in the new floor section, these butt welding clamps made it really easy.

Wednesday, May 1, 2019

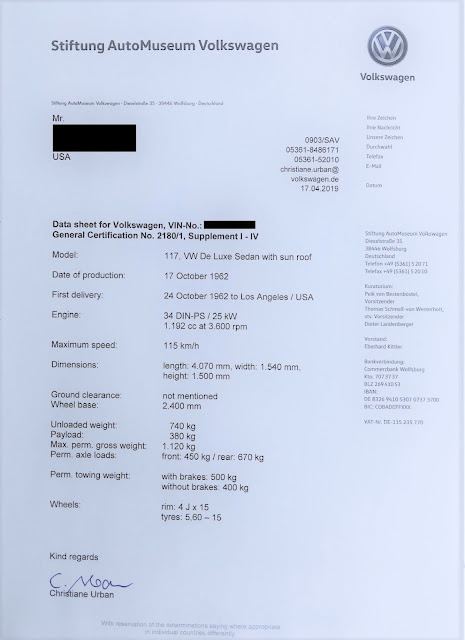
ZERTIFIKAT!!!


I finally received my Genuine Volkswagen Zertifikat and data sheet for my VW Beetle today. I sent away for it in February, so it took about two to three months. So many details, I was amazed that all of this information about this VW was kept over all these years.


I am so excited that it originally came with white walls from the factory, I love that look. From what I can find, they looked like these:

Sunday, April 7, 2019

Welding in the New Pan


I didn't have a welder, I knew I would need one. I decided on a 115v Hobart Handler and it's worked pretty well so far, and luckily, I took a welding class, so I wasn't completely inept. Plug welding looked like the way to go for this. To make sure that I put the plugs in the correct place, I marked where the lip of the tunnel was with marker on the bottom of the pan while it was in place on the rest of the chassis. I drilled holes every 1 inch to 2 inches around the edge of the pan with a step drill bit, making them about 3/16" at the biggest.

The heater vent under the rear seat was attached to the floor on the drivers side and missing on the other side. After some research, I found out that my beetle was one of few that had these. VW had these for a year and a half. Being built in September of '62, it was just three months before they would discontinue this type of vent for the round type, very cool. I was lucky enough to find a replacement vent for the passenger side on the Samba classifieds. I'm starting to realize how rare that find was, as I have not seen any others anywhere since.


I cleaned up the the heater vent on the drivers side removed all the rust and added a sheet metal bracket that I made to the back of it for reinforcement. I did this to the other side too, once I got it in the mail.

I removed the seat belt bracket from the old pan, marked, cut and welded it onto the new pan. I also did this with the battery bolt. I also welded a new battery strap bracket and jack bracket on to the new pan. I was ready to weld it onto the chassis.

Ready to weld it in.


The welds were messy at first, but I got the hang of it eventually, cleaned them off with the grinder and was ready for disassembly and sandblasting.

Tuesday, March 26, 2019

Old Pan Removal and New Pan Fitting


I removed the old pan on the passenger side with some help of this video by Duckman Cycles and VW Garage: https://www.youtube.com/watch?v=JMkahP6TE0A&t=1286s and a sawzall. With the sawzall, it literally only took about 5 minutes...amazing! In the video, the chassis is lifted onto it's side. I was able to hoist the chassis on its side to do this with the bucket of a tractor, a lot easier than trying to lift it. But, unfortunately, I didn't get any pictures of it - DAMN IT!

I removed the remains of the pan from the tunnel with an air chisel, just like the video above. I can't believe how easy this turned out to be. Thanks Duckman!

After I got rid of the tar board, it was apparent that the rust damage was worse than I had thought. It had eaten through much of the passenger side pan. Replacing the whole passenger side pan is needed.


I ordered a new passenger side pan from Wolfsburg West, the best available according to many on the Samba. The steel is as thick or thicker than the original. The only issue that I had - when I received it, the front was curled upward. I flattened it out without a problem, but it was kind of odd.


I really wish I would have took pictures of it without the pan, it was quite the accomplishment. But it all turned out well, so far.

Saturday, March 23, 2019

Chassis Cleanup

Today I removed the rubber floor mats and blew all the dirt off of the chassis. Blasted the chassis off with a pressure washer, trying to remove all of the dirt and grease, which didn't work as well as i'd hoped. But I was able to get a lot of the dirt and grease off so I could start removing the tar board soundproofing from the floors. I would suggest using a heated pressure washer if you're going to go this route. As I planned on sandblasting the chassis anyway, this wasn't that big a deal. 

The pressure washer did a decent job of making it easier to remove some of the tar board, but I'll have to go after the rest with a putty knife.


Saturday, March 16, 2019

So, you've decided to restore your classic Volkswagen...Separating the Body from the Pan

After I installed the radio, I realized that it was time to focus on the restoration of the car and not buying random parts... I knew I was going to be separating the body from the chassis so that I could go through the car completely and address every aspect of the car. After some research, I learned I would need to build these "sawhorses". These were also documented in the BugMe video series (great videos for working on your VW). The construction of these stands were very simple and straight-forward. It took 6 4'x4'x8' beams, about 4 2'x4'x8' boards and 8 Simpson brackets.


The only regret that I have is that I should have made them a little taller. I had to remove the stick shift to roll the chassis out. These are about 26" tall, a few more inches would have been better. 

After the stands were ready, I removed the engine. This is a pretty straight forward process, jacking up the car at least as high as the engine is tall so it can be dropped and slid out. Remove the wiring and four bolts holding the engine to the transmission. With some pulling and some force, we pulled it off of the transmission and dropped it, put it on a piano dolly and rolled it out of the way.


Next, I removed the bumpers and rear fenders to make room for the stands. I then removed the bolts holding the body to the chassis, except for the two in the front under the gas tank and detached the steering wheel from the steering box. I kept the two bolts in the front in until I was ready to drop the chassis in the front to keep everything from completely pulling apart in the process. 


Jacked up the back (adding jack stands and several wood blocks on top until it was high enough to reach the rear stand. I slid the stand in and dropped the chassis. Lots of creaking and cracking as the seam was broken for the first time in 57 years, very cool.


Next, I jacked up the front, doing the same with jack stands and wood blocks. I removed the two bolts and dropped the front of the chassis. Something was caught, the speedometer cable! I forgot to unhook it from the wheel! I removed that (luckily it wasn't damaged), removed the stick shift and we rolled the chassis out. We rolled it next to the body and were ready for the next project.


Thursday, March 7, 2019

Replacing the Original Sapphire Radio

So, I pulled the VW out of storage last August and I've thought about restoring it ever since. After some consideration, I decided that this was the best time in my life to work on restoring the car, so I started my research. Many of the resources that I had used 15 years ago were still around (Wolfsburg West, TheSamba, etc.) and there are now many more that I had never heard of. For the most part, anything that you could think of on a VW is available on the internet through retailers or private parties.

I started looking on eBay and The Samba for things that I had always wanted to replace on the car. The washer bottle for instance, found it on eBay. The ultimate accessory that was missing from the car ever since I had it, the original Sapphire I AM radio was missing. I researched VW radio history and came across this web page that explained it all by Mr. Rich Langenwalter. I've heard of Rich on The Samba and from what I've read, he does great work in the Sapphire radio restoration field. He'll even upgrade your 6 volt AM radio to 12 volt, get FM stations and add an AUX connection. I researched Sapphire radios and what they go for for about month or two on eBay and The Samba for the most part. Many of the radios being offered for my model year - 1963 - were worn out with broken knobs and buttons, dirty and did not work. Finding a radio with knobs and preset buttons that were intact and not stained was most important to me. After some patience, I finally found one:


It needed some cleaning, but the major things that I wanted were there: clean knobs, preset buttons, it worked and it even had a very clean undamaged face plate, I couldn't wait to install it.


Seeing a complete dash board without a giant empty hole in the middle of it was pretty awesome.